

Accurate finger holes placement on a flute is crucial as it directly affects the instrument’s pitch and tuning.
Correct finger holes placement ensures a harmonious and well-tuned sound, while deviations can result in inaccurate pitch and unstable tones.
By paying careful attention to the precise placement of finger holes, musicians can achieve accurate playing, a balanced sound, and the ability to fully express themselves through the flute.
In the previous lesson you have learnt how to make mouth hole and how to put cork to make a flute.
In this article, you will learn the ultimate use of our smart flute formula FluteMate.
By the end of your project of making a professional flute on your own, you will really appreciate our effort in bringing this secret forumla and these comprehensive lessons at your reach.
In this section you will learn finger holes placement on flute using FluteMate.
Before Using FluteMate
As mentioned earlier, FluteMate stands out as a truly unique tool. It ensures an exceptional level of precision, guaranteeing making of professional flutes. With FluteMate, you can confidently craft professional-grade flutes that consistently produce precise and reliable tones.
Before proceeding with finger holes placement using FluteMate, please ensure that you have the following two items with you:
- A bamboo or pipe cut to a length longer than what is required for the specific key or scale of the flute you intend to make. This extra length will allow for adjustments and fine-tuning during the flute-making process.
- Pre made mouth hole (Already covered in Lesson No 6)
Remember, in Lesson 5, we chose to make an E Natural Bass flute.
The various parameters of E Natural bass flute as obtained from the Flute Measurement Chart are:
| Scale | Wall Thickness | Internam Diameter | Length |
| E Natural Bass | 2.5 mm | 25 mm | 30 Inches |
Finger Holes Calculation Using FluteMate
It is presumend that you already know how to use FluteMate . You can refer to the article to know the proper usage of FluteMate.
Steps:
- Open FluteMate
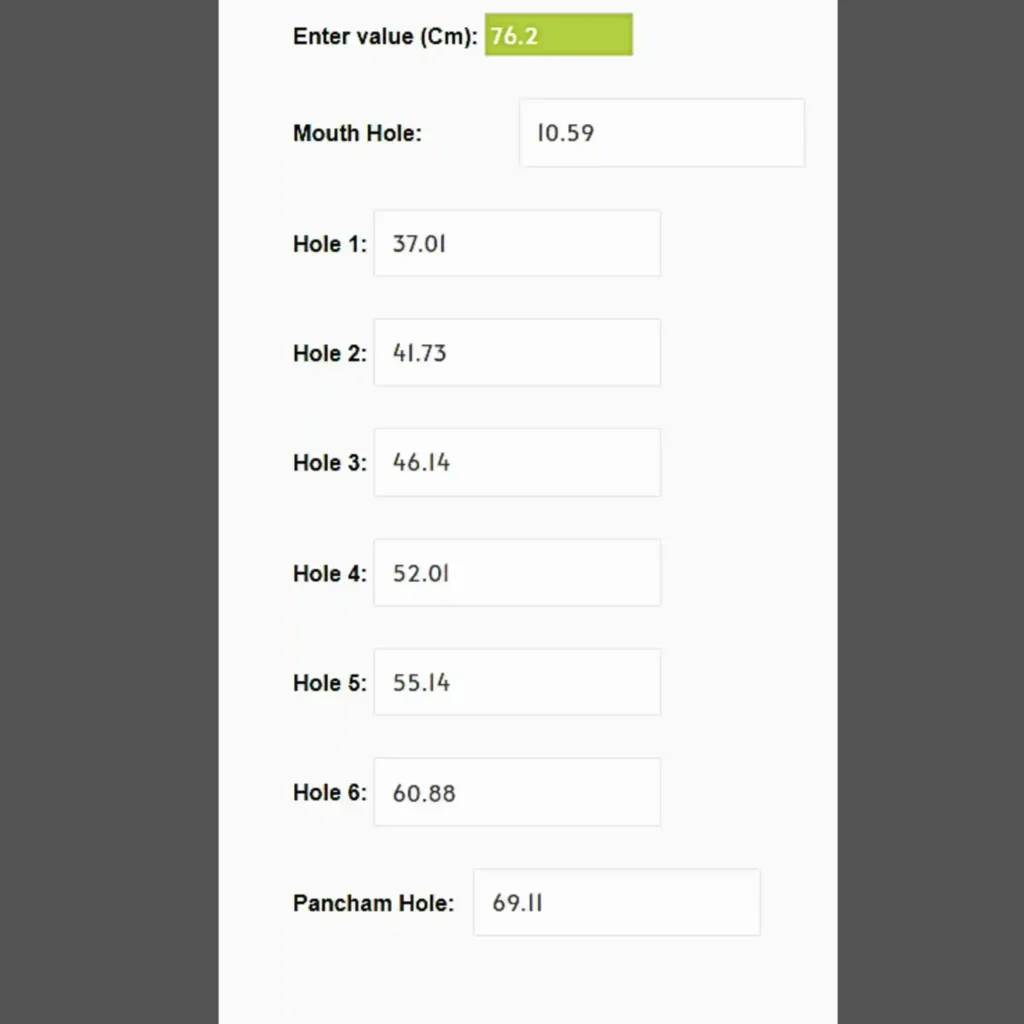
- Type the total length of E Natural Bass (in centimeters) i.e 76.2 Cm in the green box next to Enter Value (Cm) box as shown in the image below.
- Measurements of all the finger holes and Pancham Hole (7th hole/tuning hole) will appear next to the respective boxes as shown in the image below
Marking Hole Positions for Finger Holes Placement
Once you obtain the measurements of all the holes, you have to mark the hole positions on the bamboo.
Do not forget to complete the following tasks before marking the hole positions:
- Ensure that you thoroughly sand the surface area where the holes will be made using 320 grit sandpaper.
- Using a pencil, draw a straight line starting from the middle of the mouth hole and extending along the center of the bamboo all the way to the end.
- Position the measuring tape accurately at the top end of the bamboo and mark the locations for the finger holes. The following distances from the top end of the bamboo correspond to Hole 1 to Hole 7.
Hole 1 – 37.01, Hole 2 – 41.73, Hole 3 – 46.14, Hole 4 – 52.01, Hole 5 – 55.14, Hole 6 – 60.88 and Hole 7 – 69.11
Once you have completed all three steps mentioned above, you are now ready to mark the finger hole placements.
Tools Required for Finger Holes Placement
Finger holes placement on the flute involves drilling into the bamboo. To accomplish this, you will need the following tools:
- Electric power drill with various drill bits, or
- Drilling iron rods of various diameters: 6 mm, 9 mm, 10 mm, 11 mm, and 12 mm
- LPG stove or a high-pressure LPG torch to heat the drilling rods
It is recommended to use iron rods for drilling the holes as you can use LPG gas stove at your kitchen to heat the rods. Also iron rods are easy to handle.

While an electric drill can also be used, it often results in rough holes that are challenging to shape without affecting the pitch of the note.
The choice of tools ultimately depends on your convenience and preference.
It is a fact that once you become familiar with your tools, you will quickly discover ways to improve your results.
Finger Holes Placement / Drilling the Finger Holes
In the following steps, we will guide you through the proper technique of finger holes placement on your dream flute.
Steps
- Using the high-pressure LPG torch or an LPG gas stove, heat the iron rods of 6mm, 9mm, 10mm, 11mm, and 12mm until the rods become red-hot.
- Using a 6mm rod, carefully drill a hole at the marked position of the 7th hole, which is also known as the Pancham hole/tuning hole.
Note : Remember that the Pancham hole is made offset either towards your body at an angle of approximately 270 degrees clockwise or at an angle of 120 degrees clockwise from the line of holes (0 degrees) on the upper surface of the flute. The placement of the Pancham hole (Tuning hole) depends on whether you are making a left-hand flute or a right-hand flute.
- After making the Pancham hole/tuning hole, proceed to drill the remaining six holes with 6 mm rod in similar way. Ensure to drill holes keeping the rod vertical.
- Using a heated 9mm rod, carefully enlarge each of the seven holes one-by-one
- Next, using a heated 10mm rod, further enlarge all the holes.
Note : Before further enlarging the holes with 11 mm rod, remember to check each notes. Make sure that each note is just few cents below the accurate point. It is because, as you clean the burnt holes with the help of sandpaper, the holes sizes further enlarge.
- If the holes need further enlargement, using a heated 11mm rod, enlarge holes 1 to 6, while keeping the 7th hole as it is.
- The fifth hole (Nishad Hole) is the largest hole of a bansuri. Therefore , take a 12 mm heated rod and further enlarge the fifth hole.
- Turn the LPG flame off.
You can achieve the same outcome of finger holes placement using an electric drill with various drill bits, as mentioned earlier.
However, it is crucial to avoid setting the drill at a very high RPM, as it can potentially cause irreparable damage to the holes.

Allow the Flute to Cool Down
Before proceeding to the next step of tuning the flute, it is crucial to allow the flute to cool as it gets heated up during the process of making the holes.
It is not recommended to begin tuning the flute immediately after making the holes. As said before, the flute is still hot from the burning process during finger holes placement.
As the flute cools down, the pitch of the notes will decrease, potentially leading to an overall decrease in the flute’s pitch.
Once the flute has cooled down, you are ready to proceed with the final step of tuning the flute which we will cover in the next lesson.
Conclusion
Congratulations on successfully completing the process of finger holes placement on your flute!
As a beginner, it is common to face challenges when performing tasks for the first time, especially when you are unfamiliar with the flute making steps and handling the tools.
Remember that practice makes perfect. By repeating the process and gradually gaining experience, you will find that things become easier with time.
Keep in mind the importance of perseverance and patience. As you continue to practice and refine your skills, you will notice improvements and a greater sense of ease in your flute-making journey.
Embrace the learning process, and don’t hesitate to seek further guidance or support from us if needed. We are always ready to respond at your call.
In the next lesson, we will provide a step-by-step guide on how to tune the flute to achieve the best possible pitch and sound quality.
We encourage you to stay tuned for the next lesson as we continue this exciting journey of flute-making together.
Lastly, we kindly request you to share your valuable comments and feedback on what you have learned so far.
If there are any steps or concepts that you would like further clarification on, please feel free to ask your queries. We are here to assist you.
Related Topics :
Step 1 – Make Bamboo Flute with FluteMate, (Bansuri Making)
Difference Between Right Handed and Left Handed Flutes
12 Flute Making Tools to Achieve your Flute Making Dream
FAQs
What is the formula for flute holes?

FluteMate is the ultimate formula.
FluteMate helps in accurately figuring out where to place the flute holes by using percentages based on the total length of the tube. This ensures that each hole is positioned correctly, which is important for the tuning and performance of the flute.
What are the holes on a Bamboo flute Bansuri?
The holes on a flute are openings that the player covers or uncovers with their fingers to produce different pitches and notes. They include a mouth hole, finger holes, and the Pancham Hole, also known as the Tuning Hole. Additionally, a Thumb hole can be added to achieve the Madhya Pancham note.
Is a flute with holes better than without holes?
A flute with holes is essential for producing different pitches and playing a variety of notes. Without holes, a flute would be limited to producing a single pitch or tone.
How many holes does a bamboo flute or bansuri have?
A Bansuri flute generally consists of one mouth hole, six finger holes, and one lower Pancham hole. In some cases, additional holes like lower Madhyam or Lower Gandhar holes can be added.
Another hole, known as the Thumb Hole, can be created to achieve meend (Glissando) from Madhya Pancham to Gandhar or Pancham to any other lower notes. The specific hole configuration can vary depending on the Bansuri player’s preferences and the desired range of notes.
Comments are closed.