Step 2 – How to Make The Mouth Hole l How to Place Cork on Bansuri

Introduction

We believe that you have understood the various steps listed in the previous post titled “Make Bamboo Flute with FluteMate (Bansuri Making).” In this article, we will guide you through two additional steps:

  • Step 1 : How to Make the Mouth Hole on Flute
  • Step 2 : How to Place Cork on Bansuri

How to Make the Mouth Hole – An Important aspect

Let us understand why making the mouth hole is a crucial aspect of flute making. The mouth hole ensures three important things:

  • Comfortable blowing position : Its alignment, whether in the centerline or offset, ensures a comfortable blowing position.
  • Effortless blowing : Improperly made flutes require a significant amount of energy and blowing pressure to produce sound. It is even challenging to play an improperly made flute in the upper octave. Therefore, the mouth hole has to be designed in a way that ensures a comfortable and effortless blowing experience in all octaves.
  • Desired Sound : A properly crafted mouth hole ensures superb sound quality, desirable volume, and good Javari.

Therefore, we have covered this topic, “How to make the mouth hole of a flute,” in a dedicated separate article.

Types of Flutes based on holding style and structure

Before we delve into how to make the mouth hole of a flute, it’s important to understand the types of flutes based on holding style and structure:

Prior proceeding further in the topic on how to make mouth hole , it is important for you to understand the fundamental differences between a left-handed and right-handed flute.

For this, you can read this detailed article on How is a Left-Handed flute different from a Right-Handed Flute?

How to Make the Mouth Hole

Note from Previous Lesson

In the previous lesson, Step 1 – Make Bamboo Flute with FluteMate, (Bansuri Making), you learned how to obtain measurements of E Natural Bass from FluteMate and how to draw the line of holes.

In this section, you will learn how to make the mouth hole and how to customize it to ensure a comfortable blowing position, good sound quality, and volume.

Measurements of E Natural Bass

We have obtained the measurements of E Natural bass from FluteMate as under:

  • Mouth Hole – 10.59
  • Hole 1 – 37.01, Hole 2 – 41.73, Hole 3 – 46.14, Hole 4 – 52.01, Hole 5 – 55.14, Hole 6 – 60.88 and Hole 7 – 69.11

Tools required to make the Mouth Hole

The following tools are required to make mouth hole of a bamboo flute:

  • Hole Making Rods / Electric Drill
  • High Pressure LPG Torch / LPG Gas stove
  • Sandpaper

Making the Mouth Hole

Step : 1

  • Now let us mark the position of the Mouth Hole at a distance of 10.59 (approximately 10.6 cm) measured from the top end of the flute (measurements as above).
  • Next, let us heat the iron rods of 6mm, 10mm, and 11mm using an LPG gas stove or a high-pressure LPG torch. Once the iron rods turn reddrill a hole at the designated position for the mouth hole with the 6mm rod. Remember not to apply excessive force as it may damage the bamboo.
  • Subsequently, enlarge the mouth hole further using the 10mm and 11mm rods, respectively, as the ideal diameter of the mouth hole for E Natural Bass is approximately 12 millimeters.

Step : 2

  • After making the initial hole, the next step is to clean it since the surrounding areas may become black as a result of the burning . To clean the hole, you can use a roll of 150 Grit sandpaper (recommended) or a sharp knife.
  • Once you clean the hole, the mouth hole will enlarge to approximately 12 mm, reaching its ultimate size.

Mouth Hole Customization – For Left Handed Flute

  • Take a roll of 150 Grit sandpaper and carefully carve the wall opposite the blowing position (180°- 360° for left handed).
  • Also create a curved cut on the opposite wall (000° – 180°) of the mouth hole, making it smooth and slippery for the jet of air that passes through. The sound will improve tremendously.

Mouth Hole Customization – For Right Handed Flute

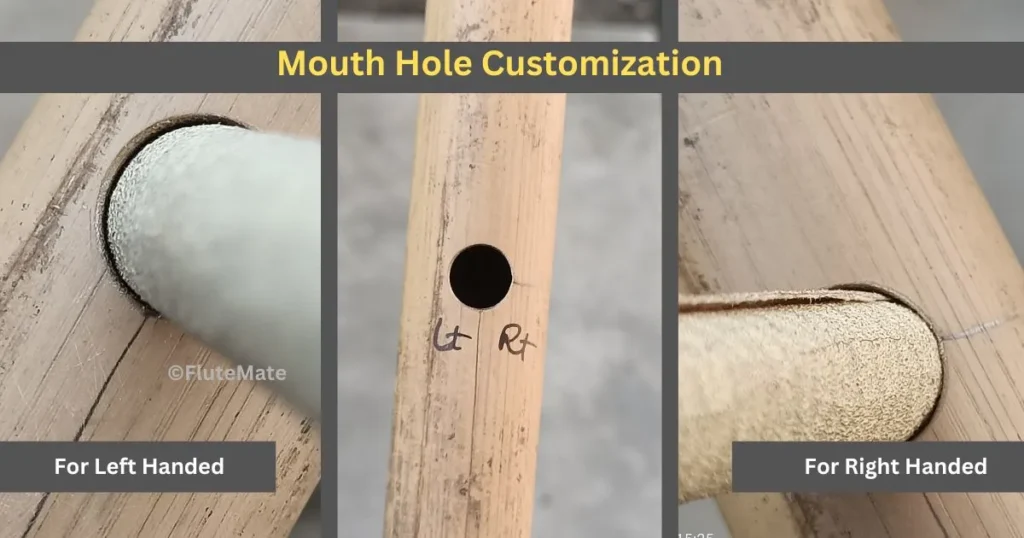
Mouth hole customization is an important aspect of how to make the mouth hole of a flute. To achieve this, follow the steps below:

  • Take a roll of 150 Grit sandpaper and carefully carve the wall opposite the blowing position (000° – 180° for right handed).
  • Also create a curved cut on the opposite wall (180° – 360°) of the mouth hole, making it smooth and slippery for the jet of air that passes through.

This adjustment will make the blowing process effortless for both left-handed and right-handed players, ensuring good volume, resonance, and javari.

This customization aims to enhance the player’s experience and optimize the instrument’s performance.

By implementing this modification, the instrument becomes effortless to be played by both left and right handed players, ensures good volume and javari.

If you leave the mouth hole as it is, blowing requires a lot of effort.

Ergonomic Mouth Hole Design

Indeed, not every flute player has long fingers to comfortably play longer flutes. In such cases, customization becomes particularly useful.

Remember that we made the mouth hole exactly at the pencil marking on the centerline in a non-customized/regular flute.

While we will discuss finger hole customization for short fingers later, in the following paragraphs, we will guide you through the process of making an ergonomic mouth hole to ensure maximum comfort especially for short fingered players..

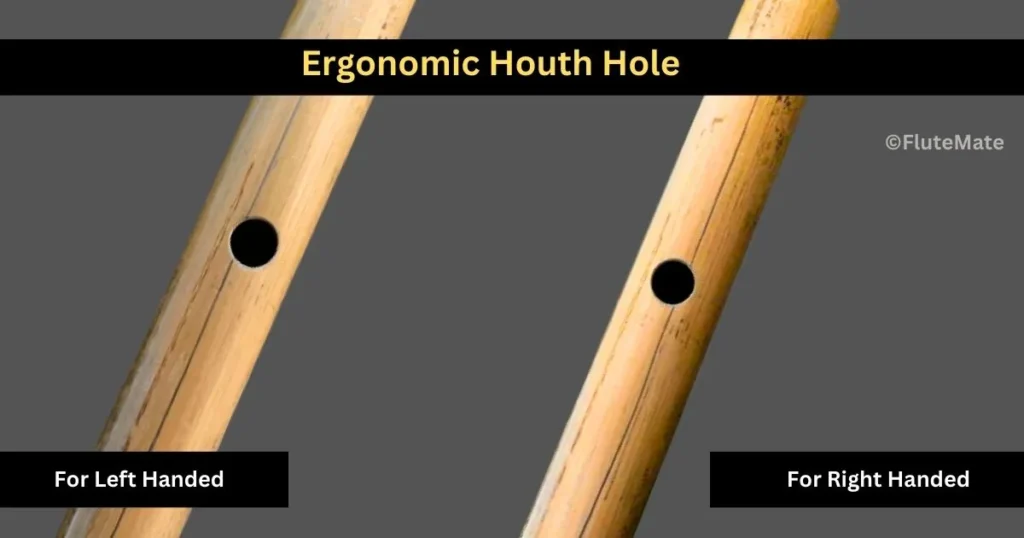
For Left Handed Players

For left-handed flute players with short fingers, tilting the mouth hole slightly inwards (towards the lip) can be recommended.

This adjustment aims to enhance the player’s comfort while blowing into the flute, reducing strain.

Short-fingered players often face difficulties in balancing between blowing into the instrument and holding it properly, and adjusting the tilt of the mouth hole can help alleviate this challenge.

For Right Handed Players

For right-handed flute players with short fingers, the opposite adjustment is made to achieve the desired outcome.

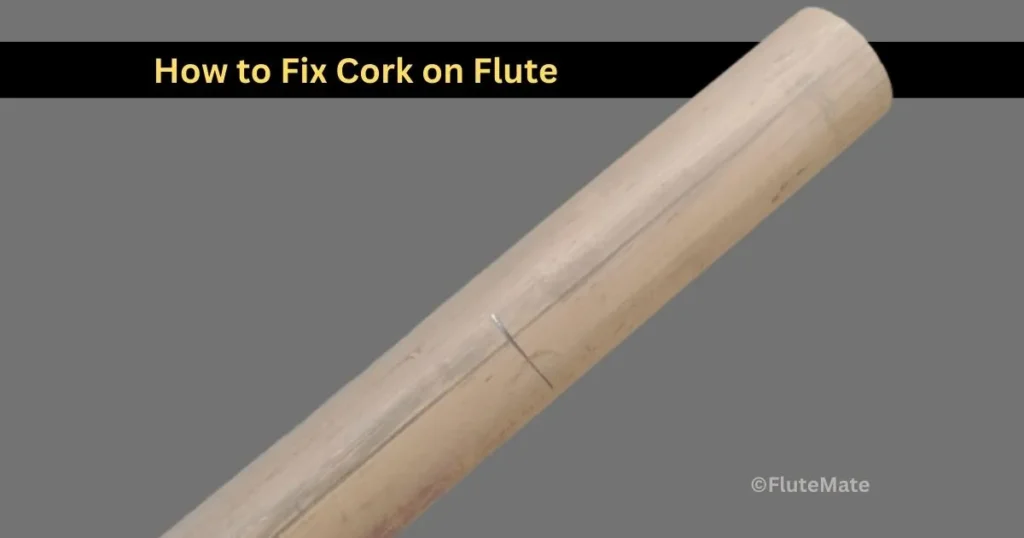
How to Place Cork on a Bansuri

You will need the following flute makin tools to place a cork on a bamboo flute.

  • A cork sheet
  • Sharp Utility Knife
  • Sandpaper

Placing a Cork on a Bansuri

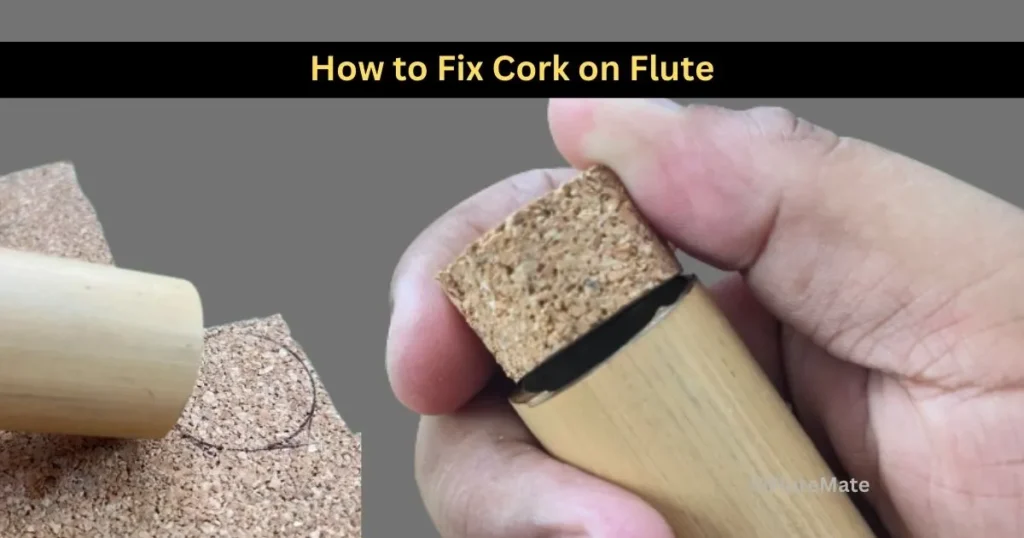
Step 1 : Preparation of a Cork

  • The first step in placing a cork on a bansuri is to cut a circular shape from the cork sheet, ensuring it is slightly larger in diameter than the bamboo of an E Natural Bass flute.
  • It is important to make the cork slightly bigger to ensure a tight fit inside the tube. This helps prevent air from escaping through loose edges of the cork, which could affect the flute’s pitch and tonality.
  • To achieve a smoother and more rounded shape, the circular cork piece can be gently sanded with sandpaper of grit 150.
  • This sanding process helps refine the edges and contours of the cork, ensuring a better fit and improved sealing inside the bansuri flute.

Step 2 : Placing the Cork

  • Gently insert the cork into the opposite end of the bamboo, avoiding excessive force that may cause the bamboo to break. Since this end is relatively wider, it should be easier to insert the cork.
  • Take a long bamboo piece with a smaller diameter and carefully push the cork all the way up until it is just a few millimeters away from the mouth hole of the flute.
  • Position the cork at a distance of approximately 5-6 mm from the mouth hole, towards the upper end of the flute.
  • Remember, this is not the final position of the cork. We will confirm the position of the cork as we drill the first hole (7th hole).

Final Words

We hope you have comprehended the steps thus far. In the forthcoming article, you will learn cutting the bamboo to achieve the first note, Tivra Madhyam.

Subsequently, we will utilize the formula derived from FluteMate to determine and mark the positions of all the remaining holes.

Finally, we will proceed to drill the rest of the holes.

If you have any confusion or questions, please feel free to leave your comments in the comment box below. We will reach out to you to help resolve any problems you may have. Cheers!


Read More:

FluteMate: 1 Secret Formula for Making Best Professional Flutes

How to use FluteMate? 100% accurate flute making formula!

Flute Measurement Chart & FluteMate – Make your dream flute easily

12 Flute Making Tools to Achieve your Flute Making Dream

21 thoughts on “Step 2 – How to Make The Mouth Hole l How to Place Cork on Bansuri”

  1. Good day!
    Thank you very much for the articles! All the information is very detailed which is great!
    In your articles, I am not clear on a few points:
    1. When you write pipe diameter, do you mean inside or outside diameter (with or without wall thickness)?
    2. What is “Pancham Hole” and why is it needed?
    3. When will the next articles come out which you announced for example drilling all the other holes?
    4. What diameter should the rest of the holes be?
    5. How to make the final tuning of the flute?

    I’m looking forward to those articles and your answer! 🙂
    Thank you very much for your work!
    Best regards!

    Reply
    • 1. Yes, ‘diameter’ is always the inner diameter. As wall thickness is mentioned separately.
      2. About Pancham, I will write a separate article soon, please stay connected.
      3. I will post the next article in few days, as I was not able to work on the website owing to my schedule.
      4. Regarding diameters of the holes, you will know in the next article.
      5. The next article will be on Tuning the Flute, please stay connected.
      You are welcome. Please share the website if you like it. As I would be very happy .

      Reply
  2. p.s. It would be great if you added the frequency response of the notes in Hertz (Hz) for each hole to the table with flute sizes and measurements.

    Reply
    • Ill soon write a separate article on this subject, plese stary connected.
      Also please give me your honest feedback on the website, the formula FluteMate, the articles or any shortcomings you have encountered.
      Thaking you.

      Reply
      • Hello,
        It’s very cool that you answer so fast! Now I’m trying to give you my feedback.
        First of all, I like the domain name of the site very match! “Flutemate” is a great name for it. You explain all important information very clearly. I like your articles very much! So I don’t know how to improve them because they are already great.
        The design of the site is good, but in my opinion, a few things can be modified. For example, pictures should be bigger or clickable so that they can be shown in a larger size after clicking on them. Another thing is the content container, which should be bigger. You can simply increase its size or come up with a separate sidebar that contains a search input, articles, archives, etc. This is because there is a lot of empty space on the sides. Thus, the web page space can be used more efficiently.
        I cannot say anything about your formula because I have not yet created a flute due to not having received all the necessary materials (articles) from you. So I am looking forward to your next articles very much!
        Thank you for your work, and good luck!

        p.s. By the way, it is difficult to buy bamboo in my country. Therefore, I have decided to replace it with a PVC pipe. However, the available pipes have these parameters: inner diameter is 284mm, wall thickness is 1.8mm, or with dimensions of 232×4.5mm. I think that the last one has walls that are too thick.
        So my question is, how should I change the flute measurements to compensate for the differences with the materials that I have and the original flute parameters? Is it difficult to add the inner diameter and wall thickness into the formula calculation so that it will be universal for all possible input parameters?

        Reply
        • Thank you for writing, first of all, I would like to thank you again for the feedback you have given earlier and also the above one.
          I have writter an article regarding Flute Scales and notes associated to that scale and there is a separate section on Frequencies of each note. You can see it here https://flutemate.in/musical-notes-music-frequency-calculator/
          Secondly, I am very busy doing other tasks and hardly find time to work on this website. I will do the necessary changes soon. I will add good quality images and replace those old ones soon.
          284 mm seems very large for a flute unless you are making a super bass bansuri like A# sharp Shankh or B Shankh.
          Regarding the last, you have to get an effective length of any flute, which is an advanced topic. Probably I will launch FluteMate Pro in coming days which will be a paid one, though nominal.

          Please stay tuned and I would like you to share this website so that anyone like you might get benefits out of it.

          Reply
          • Hello! Thank you for your answer! I apologize, I’ve made a mistake and gave you wrong measurements. I don’t want to create a didgeridoo. 🙂
            A pipe has inner diameter of 28.4mm with wall thickness of 1.8mm or another one with inner diameter of 23.2mm and wall thickness is 4.5mm.
            I want to create 2 flutes:
            1st. E Natural Bass 30 inch and
            2nd. C Natural Bass 36 inch.
            So my question is the same, how should I change the flute measurements to compensate for the differences with the materials that I have and the original flute parameters?

          • Ideally any deviation from the required parameters will lead to untuned flute. However, you can apply human expertise and attempt making flutes you desire. I can guide you but can not guarantee you will get flutes with accurate tunes.
            1. For pipe with inner diameter 28.4 ,, and 1.8 mm wall thickness, you can try making C bass, but only thing is that you have to take a pipe longer than 37 inches. Once you make the mouth hole, you can cut the pope to Tivra Madhyam (Must be little flat).
            2. For 23.2 mm diameter and 4.5 mm wall thickness, you can keep pipe around 31.5 inches and make the mouth hole, later you can cut the pipe at Tivra madhyam accurately.

            Please rememeber your flutes will not be very accurate.

            All the very best

  3. Hello. Thanks for your answers. If I understand correctly, in my case, I should approach it experimentally. Am I correct in thinking that if a pipe wall is thicker than normal, I should increase the flute length to compensate the difference? And if a pipe diameter is larger than normal, I should decrease the flute length to compensate the difference? What does “Tivra Madhyam” mean?

    Reply
  4. What a great lesson. I haven’t seen such a detailed explanation on making a blow hole until now on the Web.

    I suggest posting a close up pic of a finished blow hole showing the inside of the hole i.e. the “curved cut”.

    Reply
  5. One more thing… this lesson was loaded on 24th May, 23 and in “Final Words” it is mentioned that the next lesson would provide knowledge on how to cut bamboo to produce 1st note, Tivra Madhyam”… we are waiting for this lesson, kindly load. Thanks!

    Reply
    • I have half written the article, I am unable to manage time to complete. Yes, a lot of pics need to be changed, alot to be added. I will definitely update in the coming days.
      I would urge you all to join the telegram channel and exchange words. I would like to share you more tips there.

      Reply
  6. Dear friend Flutemate

    Below mentioned two points need some more clarification, may be with the help of closeup pics or video of (1) how to “carve” the wall opposite the blowing position (000° – 180°) and (2) what is meant by creating a “curved cut” on the opposite wall of the mouth hole (180° – 360°).

    It appears that the two sides of the hole are differently made i.e. the wall opposite the blowing position is “carved” whereas the wall towards the blowing position is “curved cut”. Therefore, these two terms used in this article needs more precise definition / explanation “carved” and “curved cut”.

    Quote:
    “1. Take a roll of 150 Grit sandpaper and carefully “carve” the wall opposite the blowing position (000° – 180° for right handed).

    2. Also create a curved cut on the opposite wall (180° – 360°) of the mouth hole, making it smooth and slippery for the jet of air that passes through.”
    Unquote.

    Thanking in advance.

    Best Regards

    Reply

Leave a Comment